

Just like bad code creates technical debt, bad Stripe hygiene creates “reporting debt”. If you don’t tread carefully, you’ll create a lot of work for yourself down the road!
Even with a basic Stripe checkout setup, it’s inevitable that you’ll be manually creating or updating customers who have custom plans, and this is where things can start to go wrong. For example:
- One-off invoices may not be tied to a subscription and therefore not counted as MRR
- Invoice updates could be mishandled, resulting in double-counted MRR
- Subscription updates may not be handled correctly using proration behavior
- Unpaid invoices might not be marked as uncollectible
- Discount codes may not be used correctly
The downstream effect of sloppy Stripe administration is incorrect metrics — MRR/ARR, retention/churn, recognised revenue, and so on. If you don’t stay on top of Stripe from the start, you’ll either need to do a big cleanup down the line, or develop complex reporting logic to account for the kinks.
The goal of this guide is to stop you from ending up in that position, or if it’s too late for that, to help you get out of it.
The guide is split into three parts:
- Stripe’s key concepts
- The ideal Stripe hygiene rules you should follow
- How you can clean up a messy Stripe instance to set yourself up for success moving forward
Stripe’s key concepts
Subscriptions
Stripe subscriptions simplify the process of setting up and managing recurring payments from customers for products or services.
Subscriptions are set up with a defined billing cycle (monthly, quarterly, annually, etc) and include information from the company side, including the billing frequency, the payment due period, the product, quantity and total. They subscriptions also include information from the customers side, including their billing method, payment method and tax information. Subscriptions can also include trial periods or discount coupons that would impact the final amount owed on associated invoices. Within a subscription you can reference and manage the invoices tied to that subscription.
In addition to standard subscriptions, Stripe allows you to create more complex subscriptions that include metered billing and usage-based pricing.
Invoices
Stripe invoices are statements of amounts owed by customers for services or products. Invoices can be generated for a one-off charge, or for a reoccurring charge as part of a subscription.
Invoices include the product/service description, the quantity, the unit price, and the final owed amount. Invoices can also include any discount coupons or proration adjustments that might impact the final owed amount.
Within each customer’s Stripe profile you can track the status of invoices tied to their account. Invoices will have one of the following statuses:
Draft:the invoice isn’t ready and hasn’t been sentOpen:the invoice is awaiting payment, and not yet overduePaid:the invoice has been paid and the payment succeededPast due:the invoice is awaiting payment, and is past the due dateVoid:the invoice is canceledUncollectible:the invoice invoice is overdue and payment is not expected
Payments
Stripe payments show the status of the amounts owed and collected by Stripe from customers in exchange for product or services. Accepted payment methods are set-up in your Stripe account and can include credit cards, bank debits, bank transfers, and more.
Every invoice has an associated payment event that is automatically created alongside it. When the invoice is open the payment status will reflect as incomplete. If payment for an open invoice is collected outside of Stripe (e.g. directly into your bank account), the payment event is automatically canceled. If the payment is collected by Stripe through an accepted payment method the payment will automatically reflect as pending, which means payment has been made and is processing. Once a payment is pending it will eventually automatically change to either succeeded or failed. Payments can also be refunded by a Stripe admin on the company side.
Within each customer’s Stripe profile you can track the status of payments owed or made, the payment method, the payment timeline, and any associated Stripe processing fees. From here you can also refunded a payment if necessary. Succeeded payments are added to your Stripe balance and will be paid out to your bank account directly from Stripe.
Stripe hygiene guidelines
Creating a New Subscription
The steps below describe the ideal set-up for creating a new subscription manually in Stripe.
- Navigate to an existing customer’s profile or create a new customer and fill out details.
- 🚩 The billing address should be added BEFORE the subscription is created and first invoice is issued. You will not be able to add the billing information to the invoice after it has been issued.
- Select the + next to the subscriptions section.

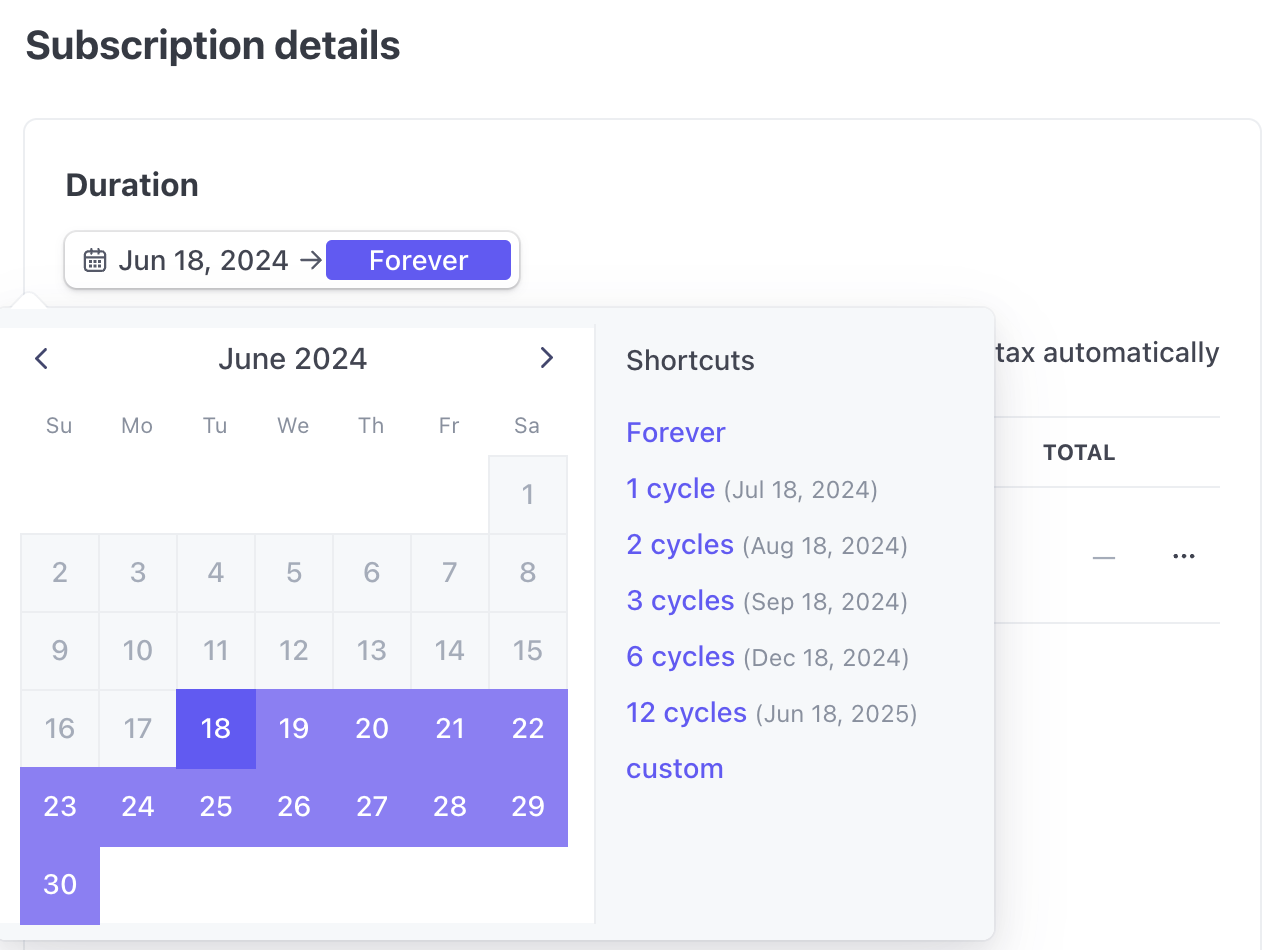
- Select the correct duration for the subscription.
- The start date should be the date you want this subscription to start.
- 🚩 The subscription start date is different from the billing start date. The subscription start date is the actual date the actual subscription started.
- 🚩 Most commonly the subscription start date will start the day you are setting up the subscription in Stripe. However, when creating a subscription that starts in the past:
- Set the past start date
- Set pro ration to yes
- Set billing anchor to the next time an invoice should be generated
- Example #1: In this example the customer already paid for the first year of their subscription before the subscription was set up in Stripe you would set the billing anchor date to 1 year after the subscription start date.
- Example #2: In this example you gave a customer access in June but forgot to set up their subscription until July. The subscription start date would be the day the subscription actually started in June, but the billing anchor date would be set to the day you are setting up the subscription. As long as pro-ration is set to “yes”, Stripe will calculate what is owed from the time in June before the subscription was set up, and will automatically add it to the first invoice.
- The start date should be the date you want this subscription to start.
- Add applicable products to the subscription.
- You can select an existing product and keep the original pricing, or edit the pricing as needed.
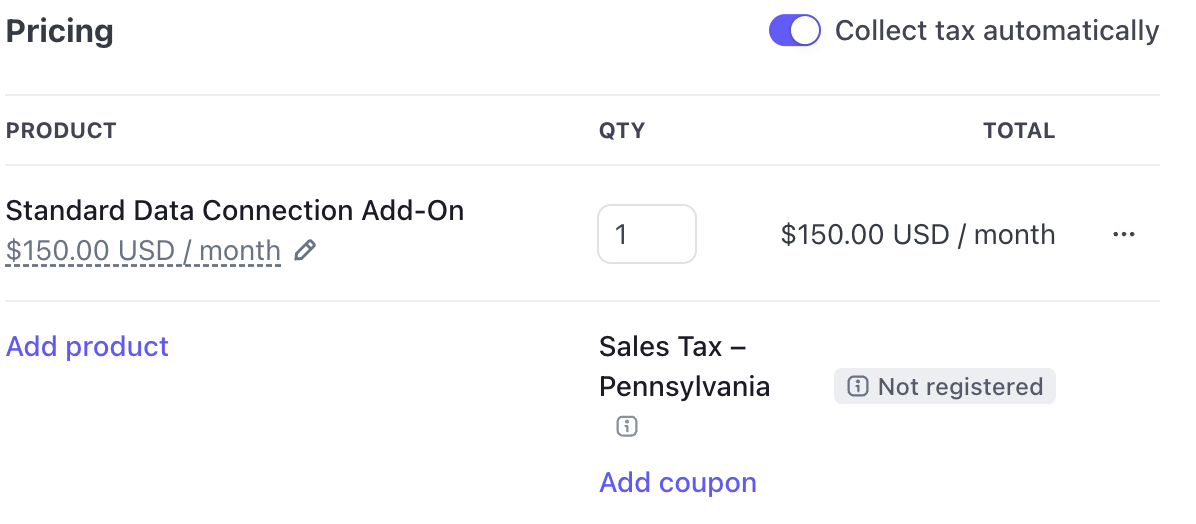
- Add any applicable discount coupon codes to the subscription.
- Discount codes give you flexibility to get the overall price to the desired price, while still displaying the full product price on the customer invoice.
- Set the billing start date, which is also known as the billing anchor date.
- As mentioned above the most common scenario will be that the billing start date matches the subscription start date. However, there may be instances where you need to set the billing anchor date to be in the future.

- Scroll down to the subscription settings section.
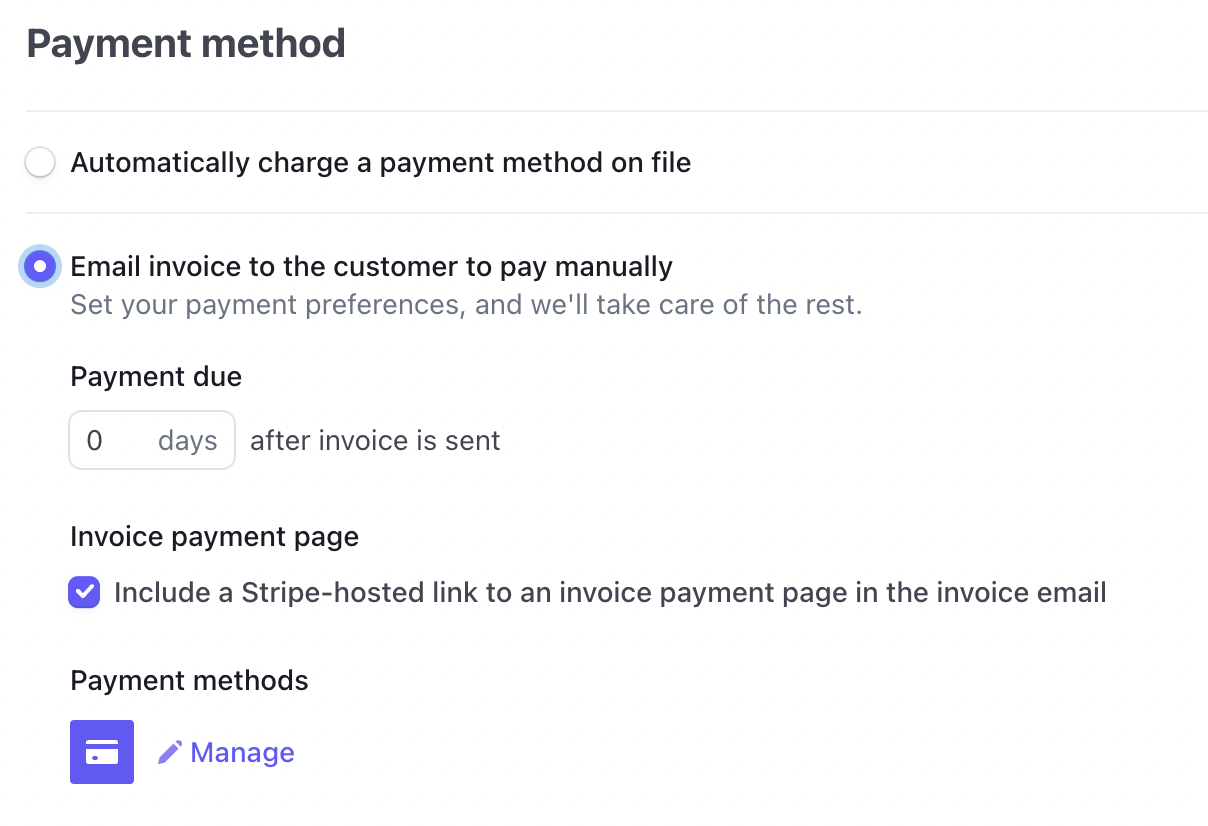
- Select if the payment should be automatically charged to the payment method on file, or if the invoice should be emailed to the customer to pay manually
- Review the subscription summary and invoice preview and confirm correctness before creating the subscription
- 🚩If the invoice is being sent for manual payment the invoice will send within an hour of creation. Any changes, or cancelations, need to happen immediately before this sends.
Creating a One-Off Invoice
It is possible to create one off invoices that are not tied to an existing subscription. Causal will not include one off invoices into MRR calculations. Sometimes this is intentional, and these invoices are not applicable as MRR. Other times this is unintentional and these invoices need to be tied back to a subscription in order to be counted as MRR within Causal. The steps below outline how to handle both scenarios.
- Log into Stripe and navigate to the customer’s profile.
- Add invoice by selecting the + sign next to invoices.
- Add applicable products to the subscription.
- You can select an existing product and keep the original pricing, or edit the pricing as needed.
- Add any applicable discount coupon codes to the subscription.
- Discount codes allow you flexibility to get the overall price to the desired price, while still displaying the full product price on the customer invoice.
- Scroll down to the invoice settings section.
- Select if the payment should be automatically charged to the payment method on file, or if the invoice should be emailed to the customer to pay manually.
- 🚩 If the one off invoice is replacing an existing invoice from a subscription, or needs to be tied back to the subscription for MRR tracking purposes **for **other reasons, there are important additional steps that you must take.
- You need to update the metadata of the new invoice metadata with the information necessary for Causal to recognize that the invoice is tied to the subscription.
- Subscription ID
- Period start date (YYYY-MM-DD)
- Period end date (YYYY-MM-DD)
- If the new invoice is replacing an existing invoice you should also ensure the original invoice is voided.
- You need to update the metadata of the new invoice metadata with the information necessary for Causal to recognize that the invoice is tied to the subscription.
Setting Up a Discount Coupon
Discount codes give you flexibility to tailor the final invoice/subscription price, while still displaying the full product price on the customer invoice.
- Log into Stripe and navigate to the Product Catalog page.
- Select the coupons tab.
- Select New.
- Name your discount code.
- Keep in mind this will be visible to the customer on their invoices and receipts.
- Select the type of discount needed - 1) ⭐ Percentage discount 2) Fixed amount discount.
- 🚩 When added to subscriptions discounts will apply to the entire subscription amount, no matter how much the total subscription amount increases or decreases during each billing cycle. Because of this Causal recommends fixed amount discounts on subscriptions when possible, instead of percentage discounts.
- Example #1: Customer X purchases a monthly subscription that includes the base product at $100 per month. During their initial consultation period you convince them to add 1 add-on product to their subscription. Your add-on products are normally $50 per month, however you agree to give Customer X the add-on product for only $25 per month. Their total subscription should be for $125 per month. You would create a “Customer X discount code” for a fixed amount of $25, which you add to their subscription. Customer X sees the full price for the products in their subscription, while also seeing the $25 discount on their invoice.
- 🚩 When added to subscriptions discounts will apply to the entire subscription amount, no matter how much the total subscription amount increases or decreases during each billing cycle. Because of this Causal recommends fixed amount discounts on subscriptions when possible, instead of percentage discounts.
- Select the duration of the discount code 1) forever 2) once 3) multiple months.
- Stripe gives you the option to create a customer facing discount code, which can be used for referral programs or similar. If you plan to use your code internally only this does not need to be turned on.
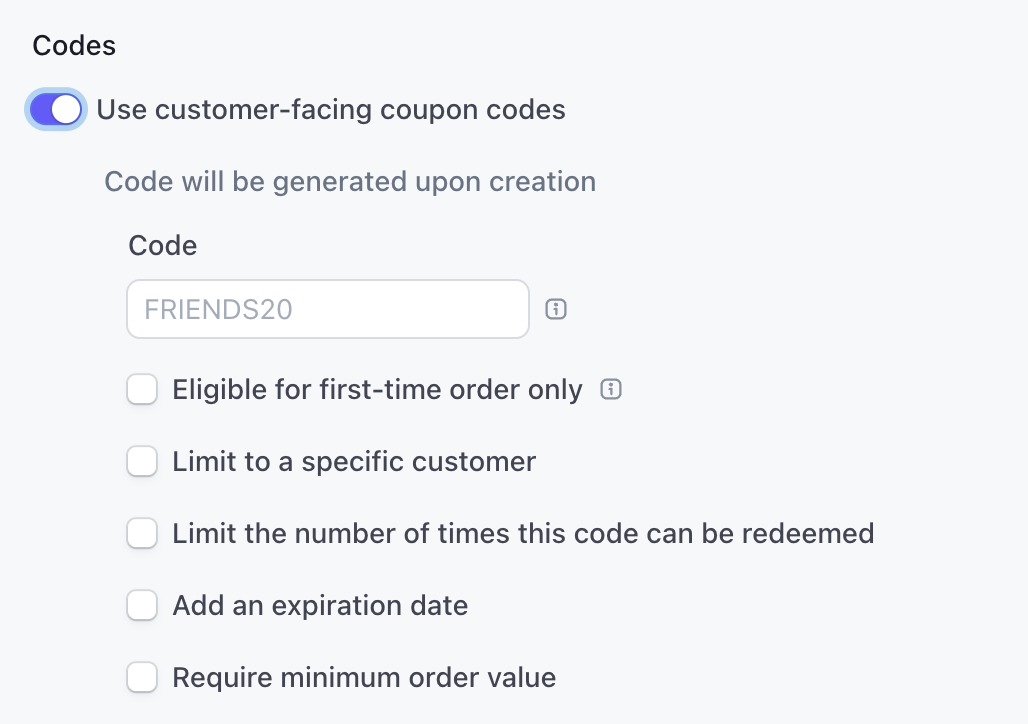
- Save coupon.
- Navigate to customer’s Stripe profile and add the coupon code to the customer’s subscription or invoice during set-up.
Admin
Updating Billing Contact Person
- Confirm the new contact’s information
- Name
- Search the old billing contact in the Stripe dashboard and select the customer profile.
- Click the menu button on the right side, and click Edit information.
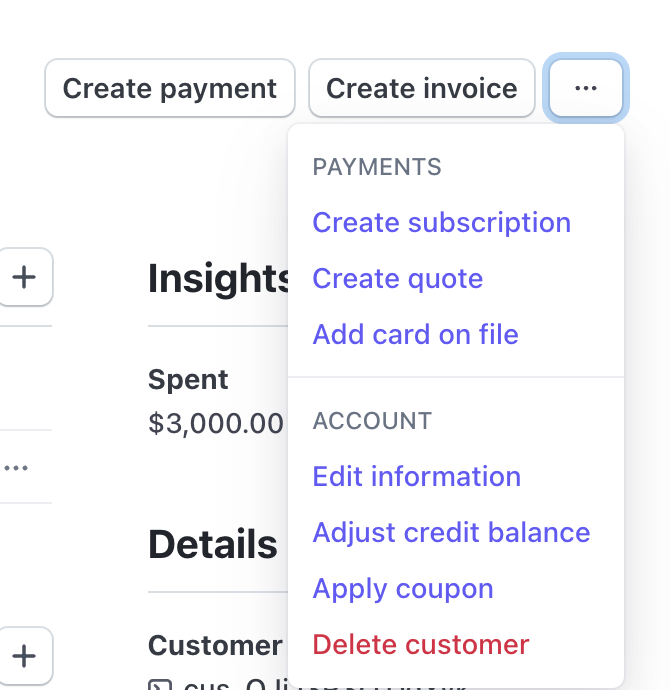
- Change the name and email to the new billing contact and click Update Customer.
If the new billing contact also needs to update their payment information on future invoices continue with the steps below:
- Under Subscriptions you should see their active subscription.
- Hover over the subscription and select the ✏️ under the menu options.
- Scroll down to Payment method and change from automatically charging to Email the invoice to pay manually.
- Once this is updated, make sure to click on Update subscription on the top right.
- This will send the invoice to the new billing contact so they can add their payment information.
Updating Payment Method
- Login to Stripe and navigate to the customer’s Stripe profile.
- You should see their active subscription at the very top of the customer profile under Subscriptions.
- Hover over the subscription and select the ✏️ from the menu options to update the subscription:
- Scroll to the bottom under Payment method.
- Select the new payment method and save.
Recommended Stripe Settings
Preventing Failed Payments
- Stripe will notify customers about their expiring cards on file.
- Turn this setting on by navigating to Settings —> Billing Settings —> Subscription & Email Settings —> Prevent Failed Payments.

Manage Failed Payments for Subscriptions
- Under Settings —> Billing Settings —> Subscription & Email Settings —> Manage Failed Payments for Subscriptions
- You can set the course of action that Stripe will take once a payment method and all retried have failed.
- Causal recommends you set this to mark the subscription as unpaid.
- With this setting turned on the subscription will continue to generate invoices for each billing cycle that remain in a draft state. Someone internally will need to follow-up with the customer regarding their failed payment and overdue subscription.
- Causal recommends these settings because you are not able to reactivate a subscription once it is canceled in Stripe. If the customer responds with the intention to pay the overdue invoices after the subscription has already been canceled you will need to create a new subscription and new invoices for the period that was owed. Customers may be more responsive to outreach attempts from an internal team member than they are to automated emails from Stripe. If you have the bandwidth on your team, we recommend attempting to contact the customer yourselves over a set period of time before canceling the subscription.
- If the customer does not pay for the overdue invoice, or update their failed payment method on file, despite outreach attempts from your internal team you will need to manually cancel the subscription and mark the overdue invoice as uncollectible.

Manage Overdue Invoices
- Under Settings —> Billing Settings —> Subscription & Email Settings —> Manage Failed Payments for Subscriptions
- You can set the course of action that Stripe will take once an invoice that was sent for manual payment becomes overdue. You can also set the course of action that Stripe will take towards the corresponding subscription that the invoice was tied to. Causal recommends you set this to leave the invoice and subscription past-due.
- With this setting turned on the subscription will remain active as the invoice and subscription are marked as past-due. Someone internally will need to follow-up with the customer on their overdue invoice and inquire about payment.
- Once the invoice is paid the invoice will be marked as paid, and the subscription will be automatically marked as current.
- Causal recommends these settings because you are not able to reactivate a subscription once it is canceled in Stripe. If the customer responds with the intention to pay the overdue invoices after the subscription has already been canceled you will need to create a new subscription and new invoices for the period that was owed. Customers may be more responsive to outreach attempts from an internal team member than they are to automated emails from Stripe. If you have the bandwidth on your team, we recommend attempting to contact the customer yourselves over a set period of time before canceling the subscription.
- If the customer does not pay for the overdue invoice despite outreach attempts from your internal team you will need to manually cancel the subscription and mark the invoice as uncollectible.


Cleaning up an existing Stripe instance
Subscriptions
Amending an Existing Subscription - The Basics
You can change existing subscriptions without having to cancel and recreate them. If you have the Stripe customer portal feature set up you can direct customers to change their subscriptions on their own through the system.
The instructions below outline the basic steps for amending an existing subscription.
- Find existing customer and subscription
- Select the ✏️ next to their active subscription

- Choose existing products and make applicable changes, or add new products as needed.
- If needed add discount coupon to get overall price to desired price.
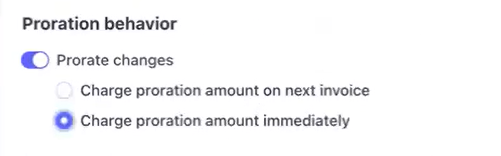
- Turn on proration behavior, and select one of the 2 available actions depending on how you want to bill the customer.
- Proration is where the customer is charged a percentage of a subscription’s cost to reflect partial use during a billing cycle.
- Charge proration amount on next invoice will add any owed amount to the customer’s next invoice.
- ⭐ Charge proration amount immediately will do one of two things depending on if the subscription is upgrading or downgrading. Causal recommends this setting, because this will let our system know instantly about the MRR change.
- If the subscription amount is increased, the proration behavior will create an invoice outside of the regular billing cycle to charge the customer for any amount owed from the time the changes were made until the next regular billing period.
- If the subscription amount is decreasing, the proration behavior will generate a credit in the customer’s stripe balance to be applied to reduce the cost of future invoices.
- Scroll down to the subscription settings section.
- Select if the payment should be automatically charged to the payment method on file, or if the invoice should be emailed to the customer to pay manually.
- Review the subscription summary and invoice preview and confirm correctness before creating the subscription.
Updating Subscription Amount
Scenario: You need to change the amount of a subscription for an existing customer before their renewal. You do not want to change the billing date and want to schedule the change to happen at the time of renewal and *not before.
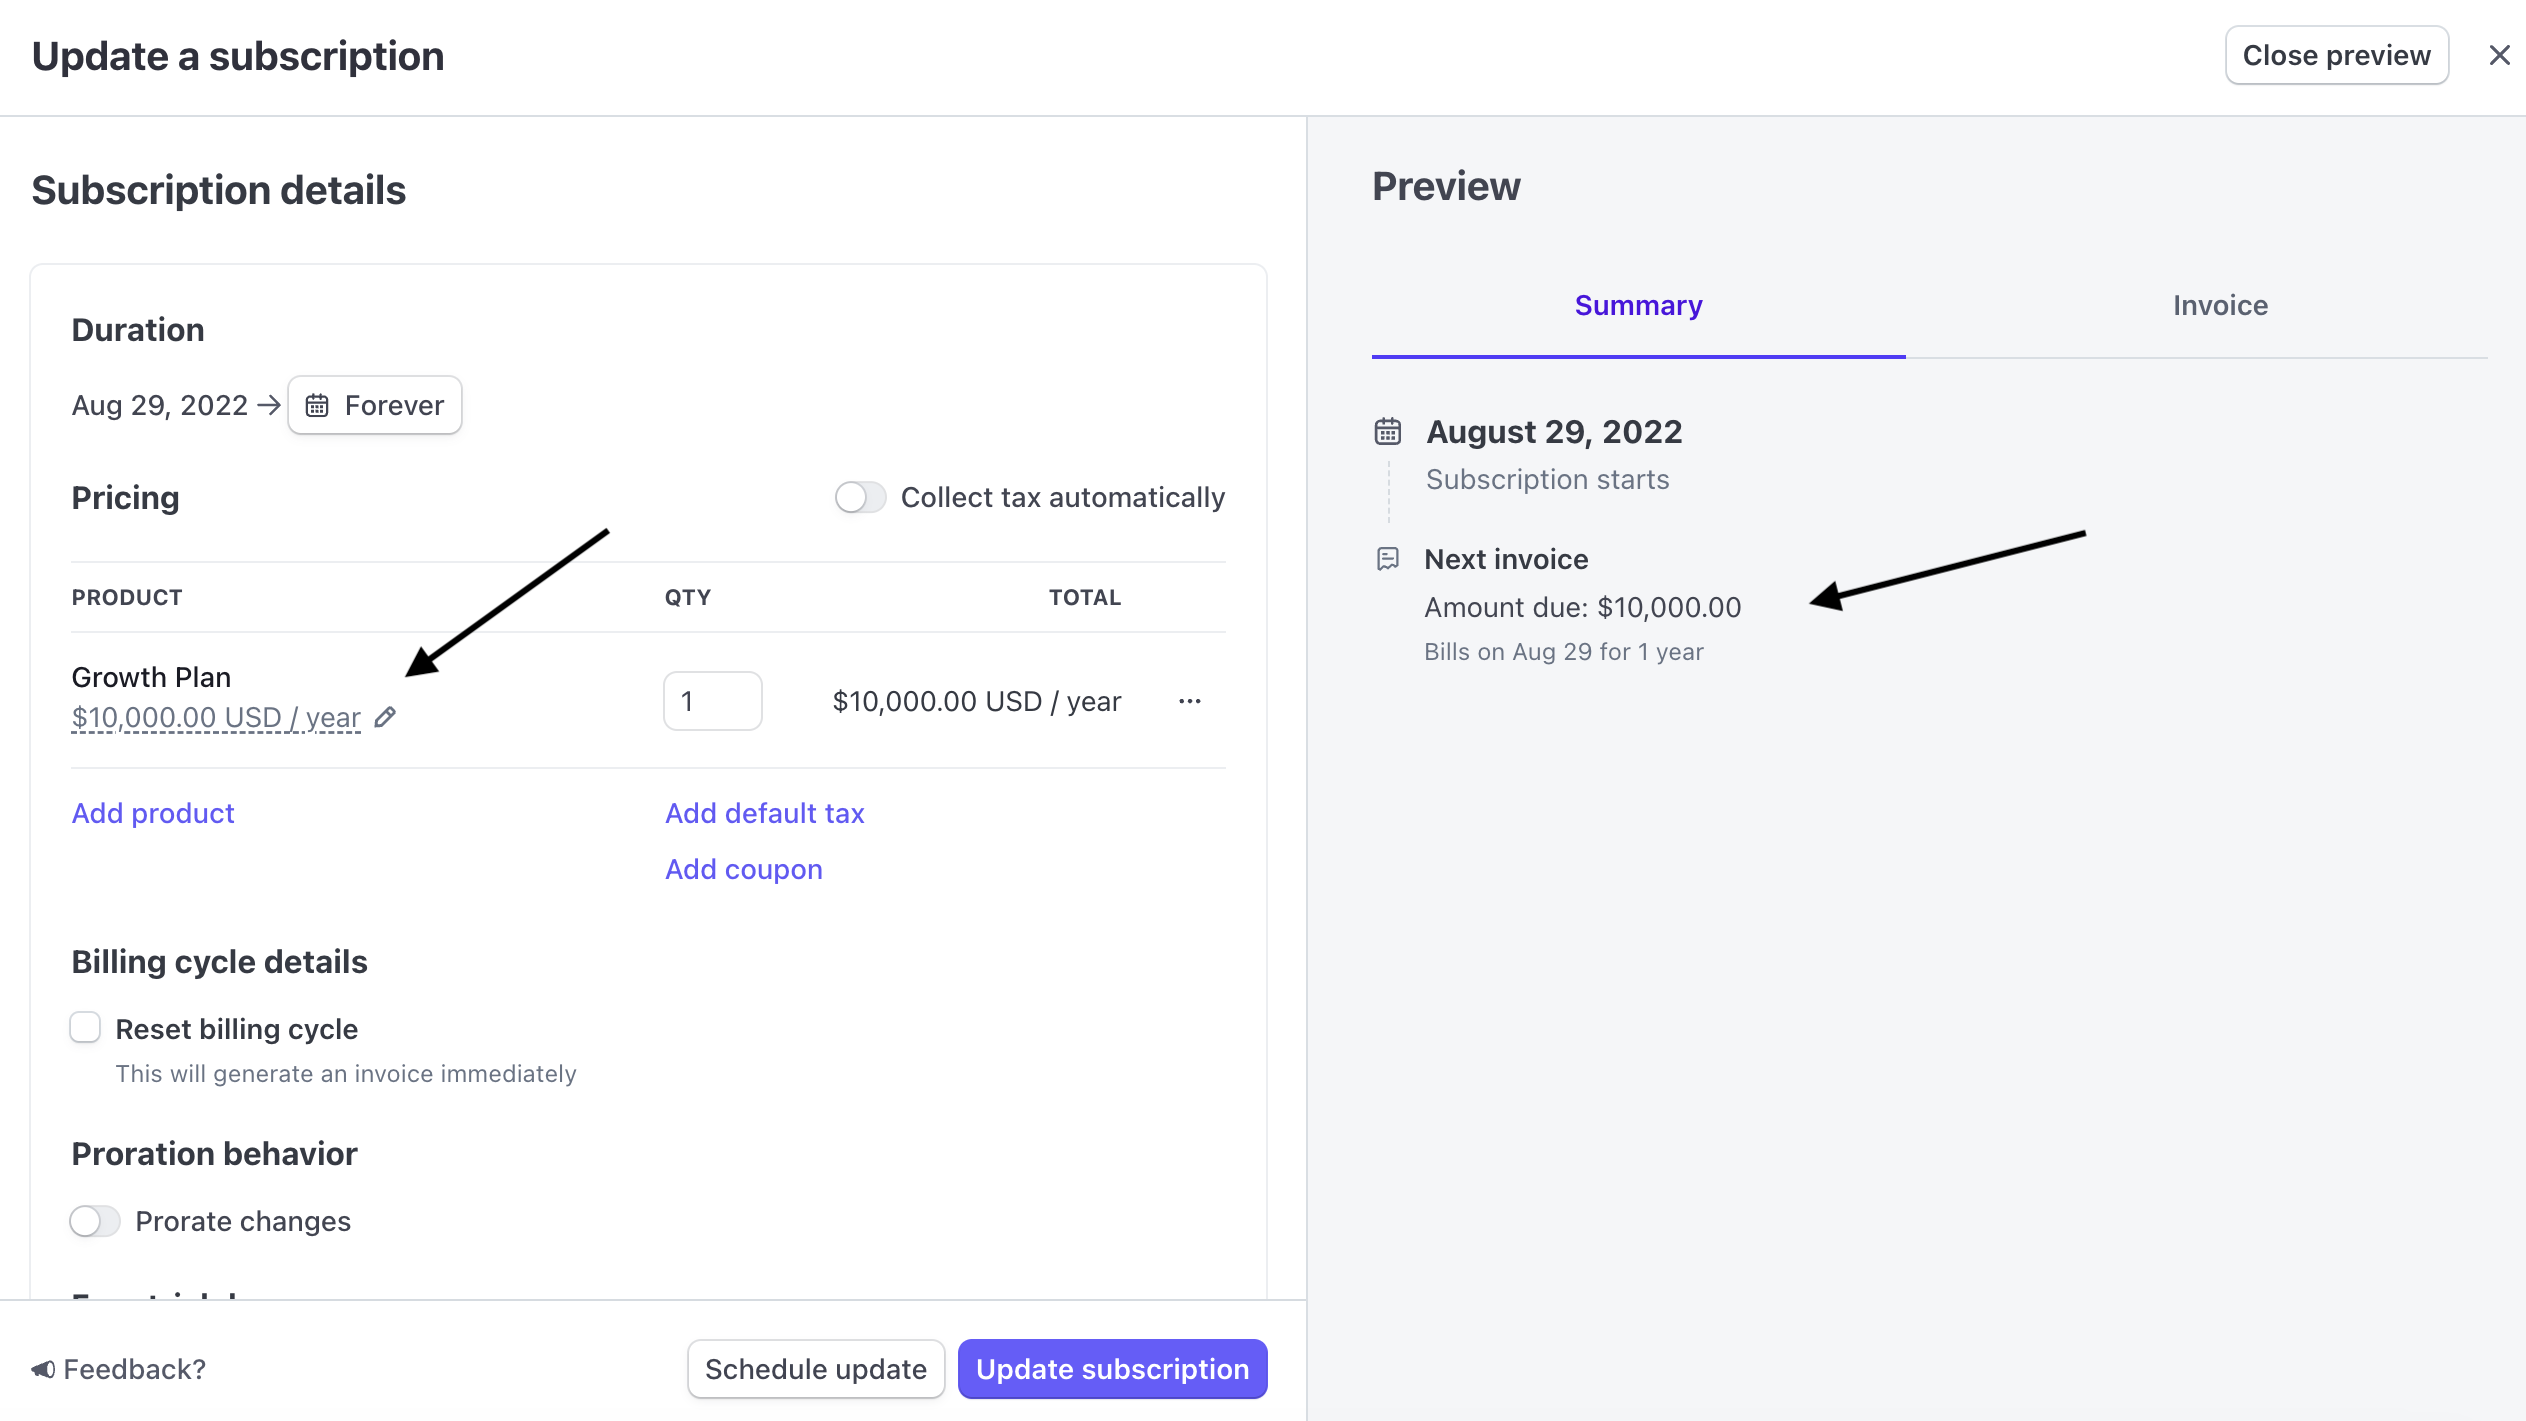
Example #1: Customer X is on an annual plan for $18,000. They have agreed to renew their subscription, but their needs have changed and you have agreed on a lesser rate of $10,000 annually. Their subscription renews on August 29, 2024 and their new rate will take effect on this date. The current date is June 11, 2024, and you want to update their subscription today, but do not want the change to become effective until the renewal date.
Solution:
- Step 1: Navigate to the customers Stripe profile and select “Update Subscription”
- Step 2: Update the pricing of the product they are paying for
- In this scenario we updated the pricing from $20,000 annually to $10,000 annually
- Step 3: Confirm the next invoice date is correct and did not change
- Step 4: Confirm if you want to charge the customers payment method on file, or send them the invoice for payment.
- Step 5: Confirm all details and update the subscription
Updating Subscription Billing Date
Scenario: You need to update the subscription billing date and amount for an existing customer.
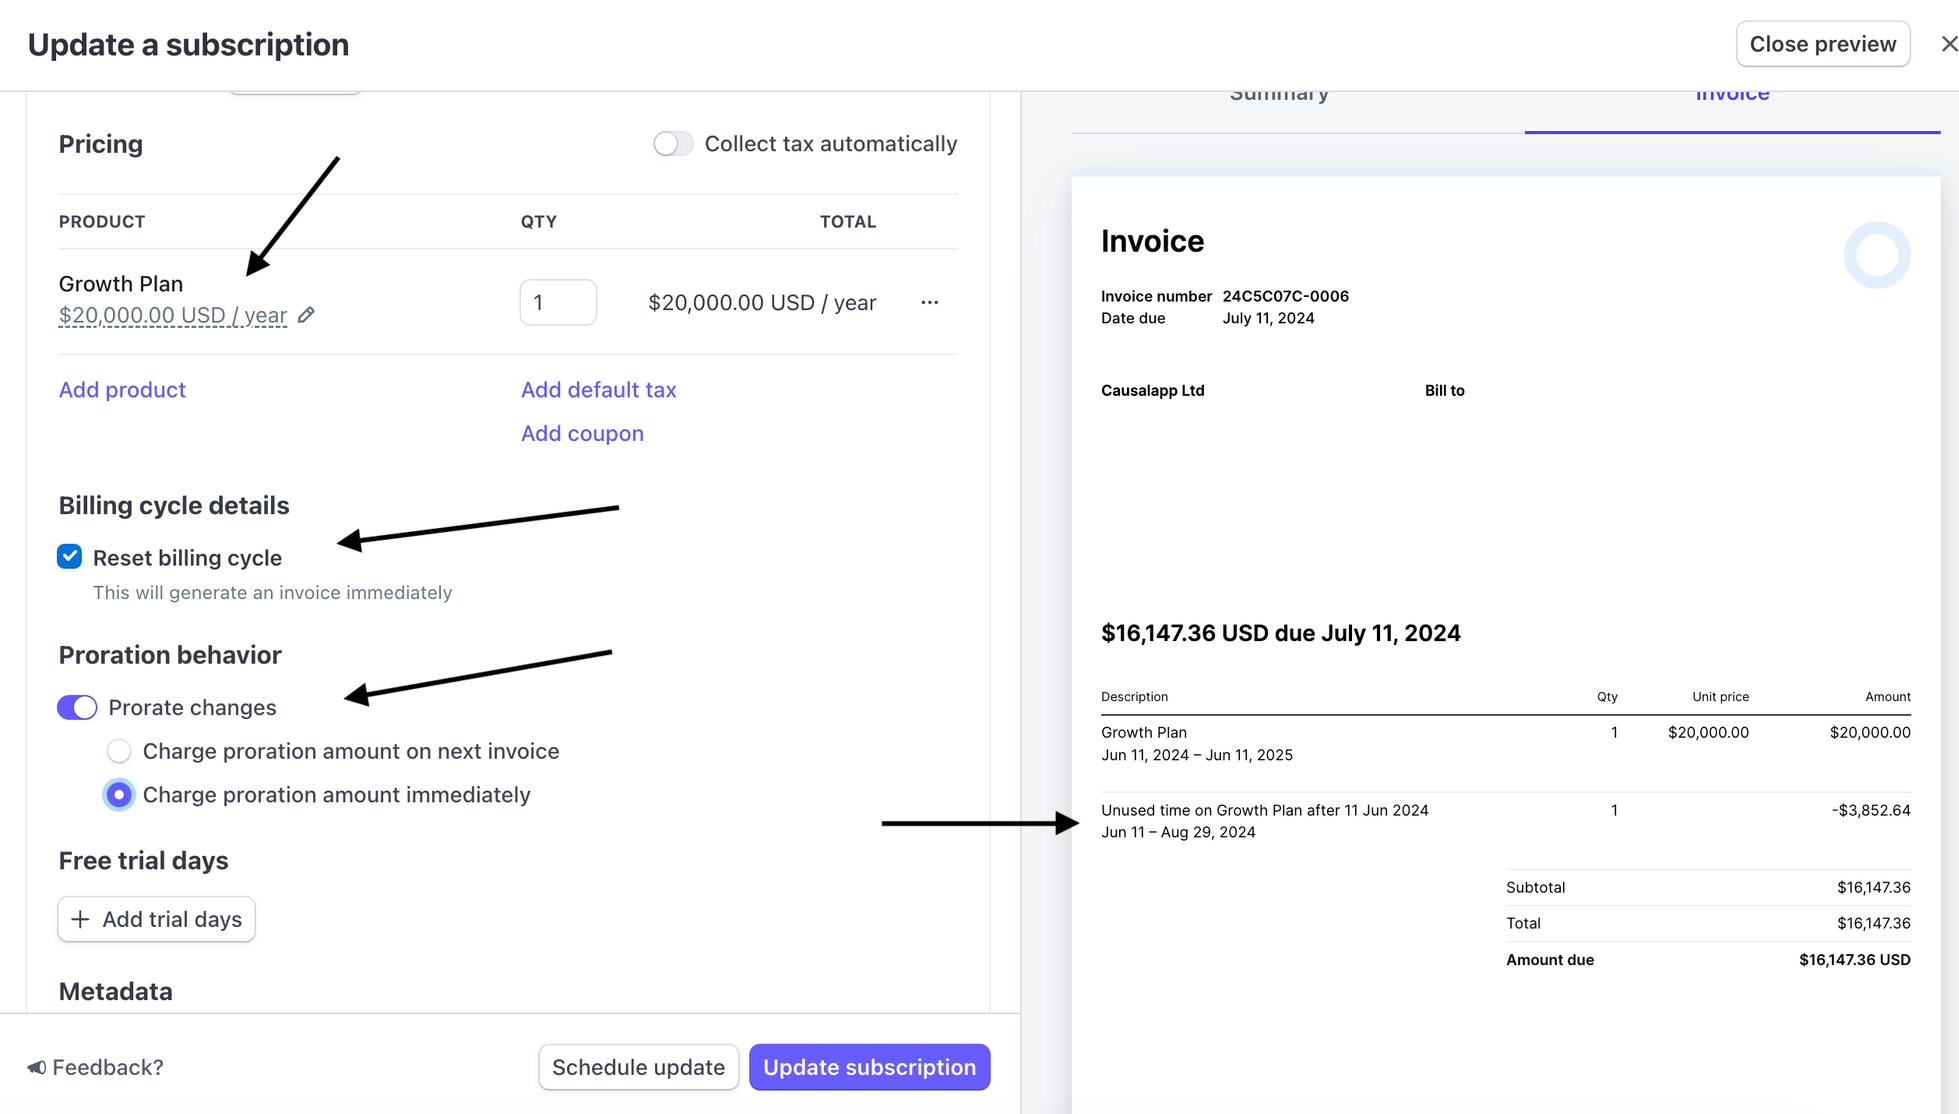
Example: Customer X is on an annual plan running from August 29, 2023 - August 29, 2024 for $18,000 annually. However, on June 11, 2024 you expand this customer to $20,000 annually, and want to charge them immediately and reset their billing cycle.
Consideration: You need to account for the amount that this customer has already paid for the period of June 11, 2024 - August 29, 2024, since they already paid in full at the start of their subscription.
Solution:
- Step 1: Navigate to the customers Stripe profile and select Update Subscription.
- Step 2: Update the pricing of the product they are paying for.
- In this scenario we updated the pricing from $18,000 annually to $20,000 annually.
- Step 3: Select Reset Billing Cycle.
- This will reset the date of your billing cycle to today’s date. In this scenario our customers original billing date was August 29 each year. We have now reset the date to June 11 each year.
- Step 4: Switch on the option to Prorate changes and select Charge proration amount immediately.
- 🚩 This is a very important step. The proration behavior is what tells Stripe to account for the amount this customer has already paid for the period of June 11, 2024 - August 29, 2024.
- Step 5: Confirm if you want to charge the customers payment method on file, or send them the invoice for payment.
- Step 6: Confirm all details and update the subscription.
Updating Subscription Billing Interval
Scenario: You need to change the subscription billing interval (e.g. annual to monthly) for an existing customer.
Example: Customer X is on an annual plan running from June 11, 2024 to June 11, 2025. Ahead of their renewal they have decided they want to switch their billing interval to monthly instead of annually. This billing interval change will not take place until their renewal.
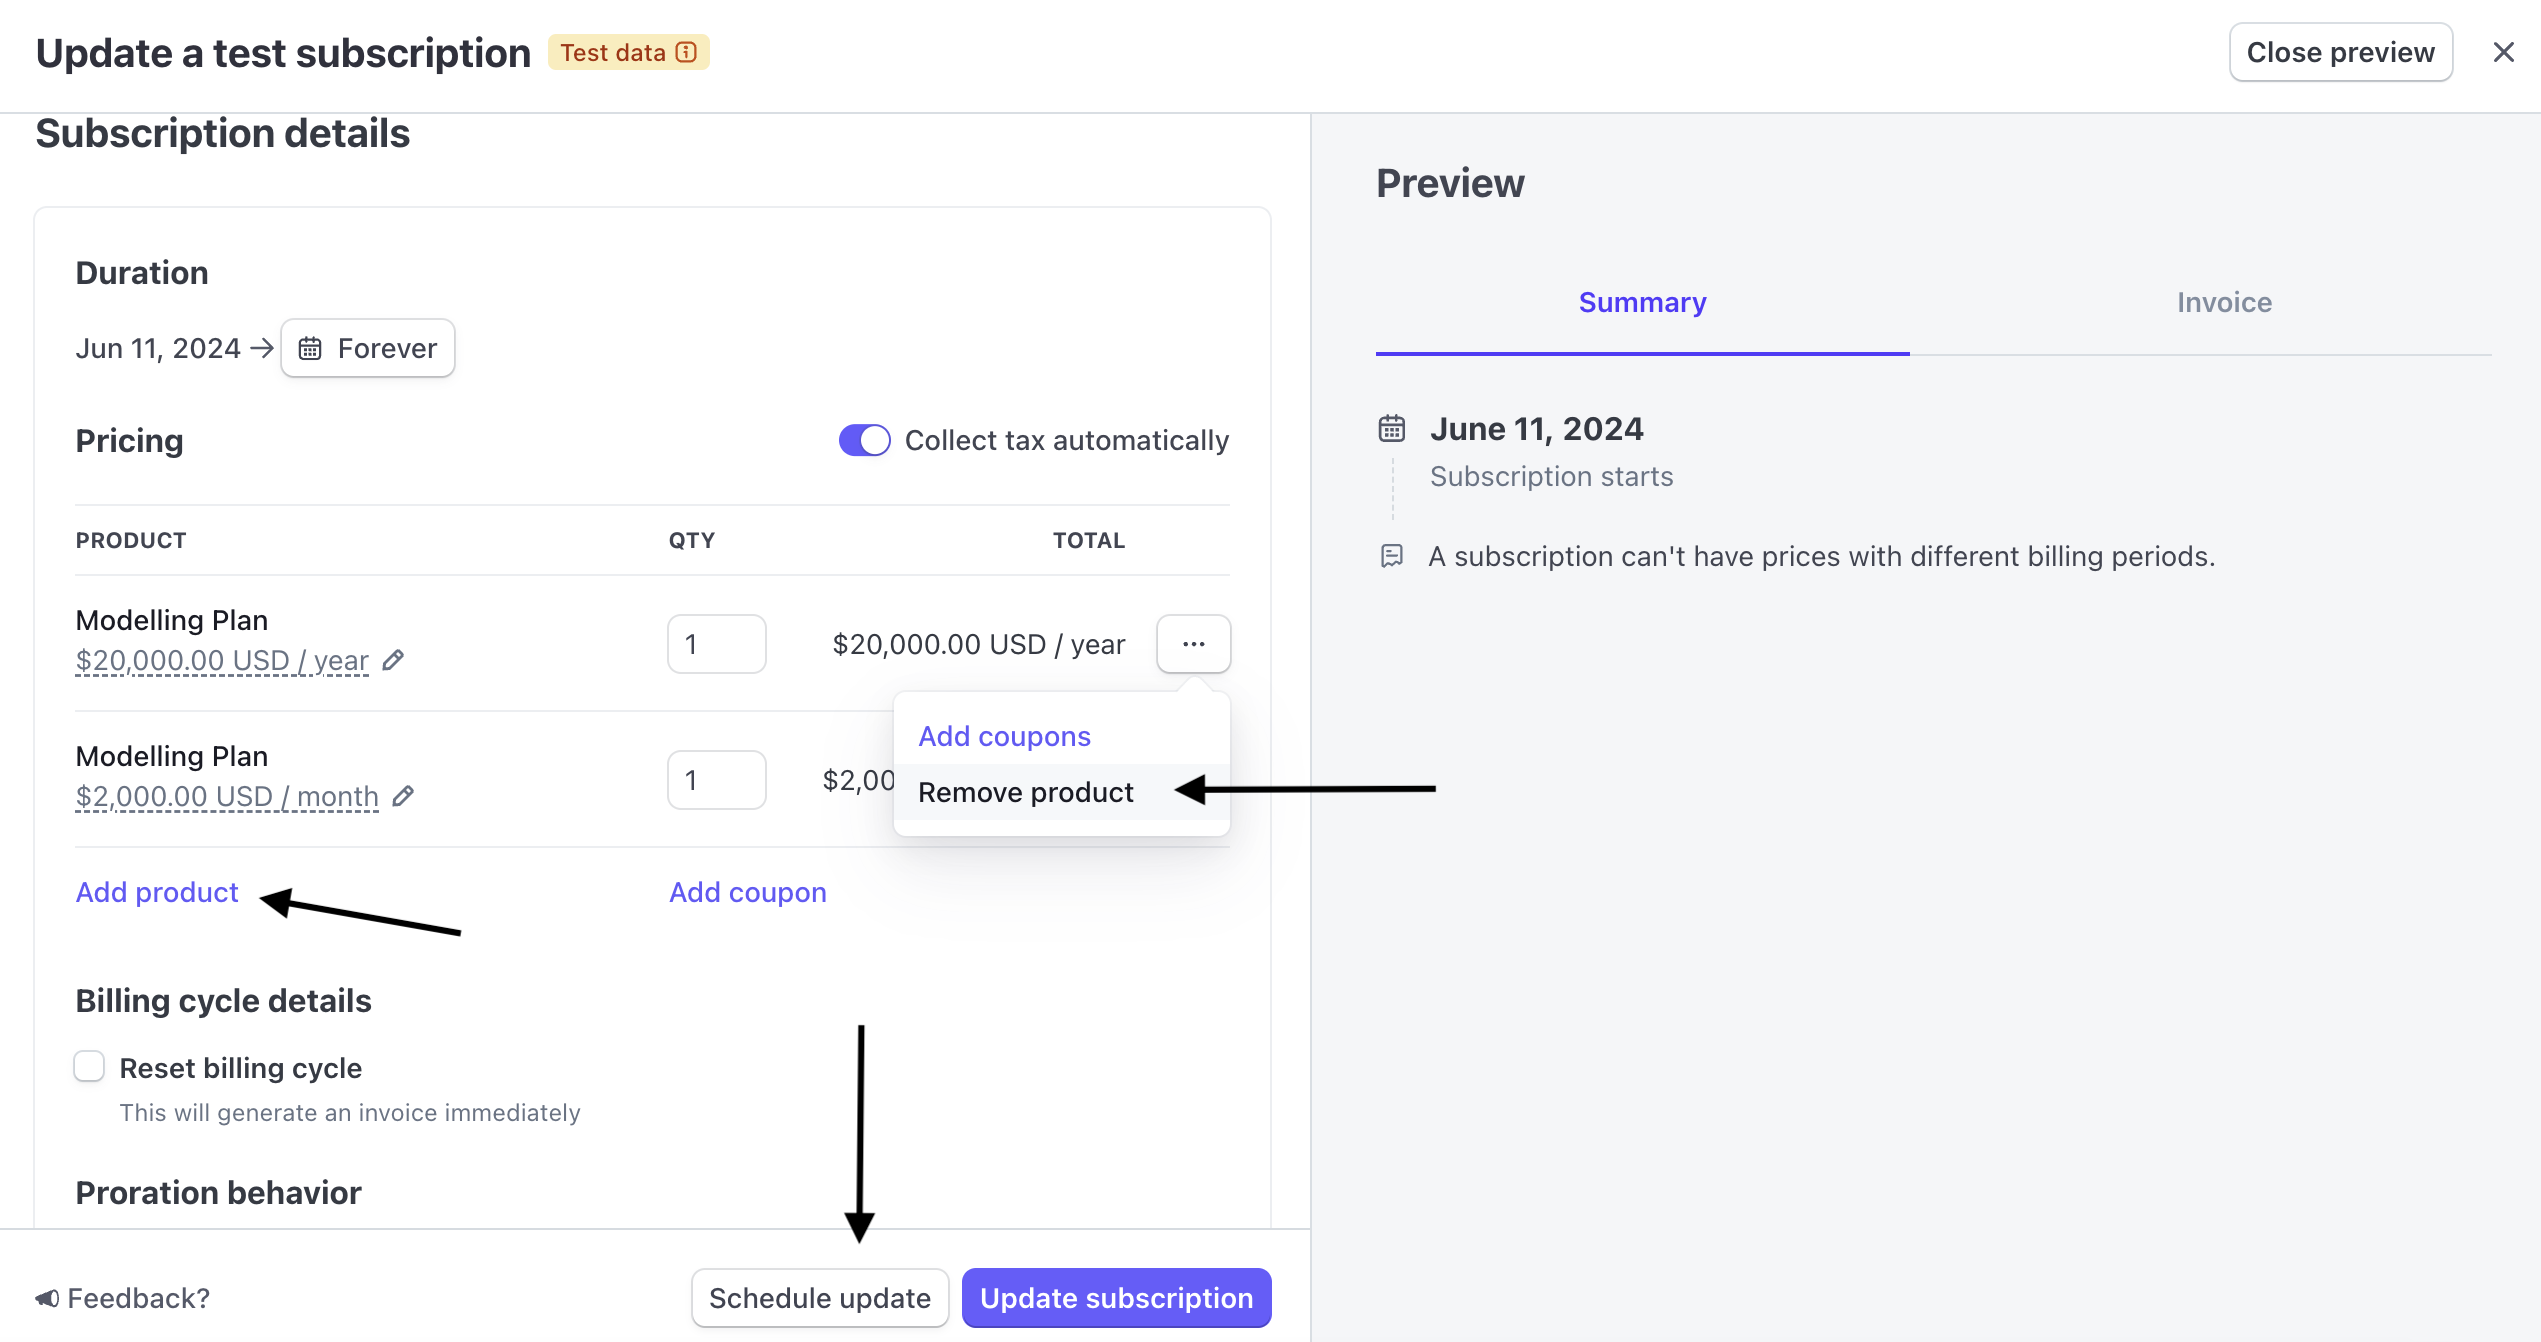

Solution:
- Step 1: Navigate to the customers Stripe profile and select Update Subscription.
- Step 2: Select Add Product and enter the product and pricing details for their new subscription.
- In this scenario Customer X is staying on the modeling plan, but is switching to monthly billing rather than annual billing.
- Step 3: Select the three dots to the right of their existing product and select Remove Product.
- Before doing this you will see an error message from Stripe that says “A subscription can’t have prices with different billing periods”. Once you clear the original product/price this warning message will go away.
- Step 4: Confirm if you want to charge the customers payment method on file, or send them the invoice for payment once the change takes place.
- Step 5: Confirm all details and select Schedule Update.
- Step 6: Select the date on which your changes will apply and save.
- In this scenario we do not want to change the billing interval for Customer X until the end of the current period, which is the end of their annual subscription.
Adding a Trial to Change the Billing Cycle
Adding a non-prorated trial period to an existing subscription allows you to configure the billing cycle to be any date. Typically, if you’re using the trial period to change the billing cycle without issuing a prorated invoice, you disable proration because the length of the trial period accounts for the portion already paid from the previous billing cycle.
For example, if a customer has an active subscription set to bill next on July 23, and you introduce a trial period until August 1:
- The customer receives a 0 USD invoice on July 15.
- The customer isn’t billed on July 23.
- The customer is billed next on August 1, then on September 1, and so on.
- The customer already paid through July 23 in the previous cycle, so that “free” period isn’t actually free.
- The period between July 23 and July 31 isn’t charged.
- The new cycle billed on August 1 is a full cycle at the normal rate.
Payments
Manually Updating Invoice Status
There are instances where you will need to update the status of an invoice manually.
Example #1: If a customer makes payment for an invoice directly into your bank account rather than Stripe you will need to manually mark their invoice as paid. You can do so by clicking into the invoice in the customer’s Stripe account, selecting the invoice in question, navigating to the menu to the right of the page, and selecting Change Invoice Status.

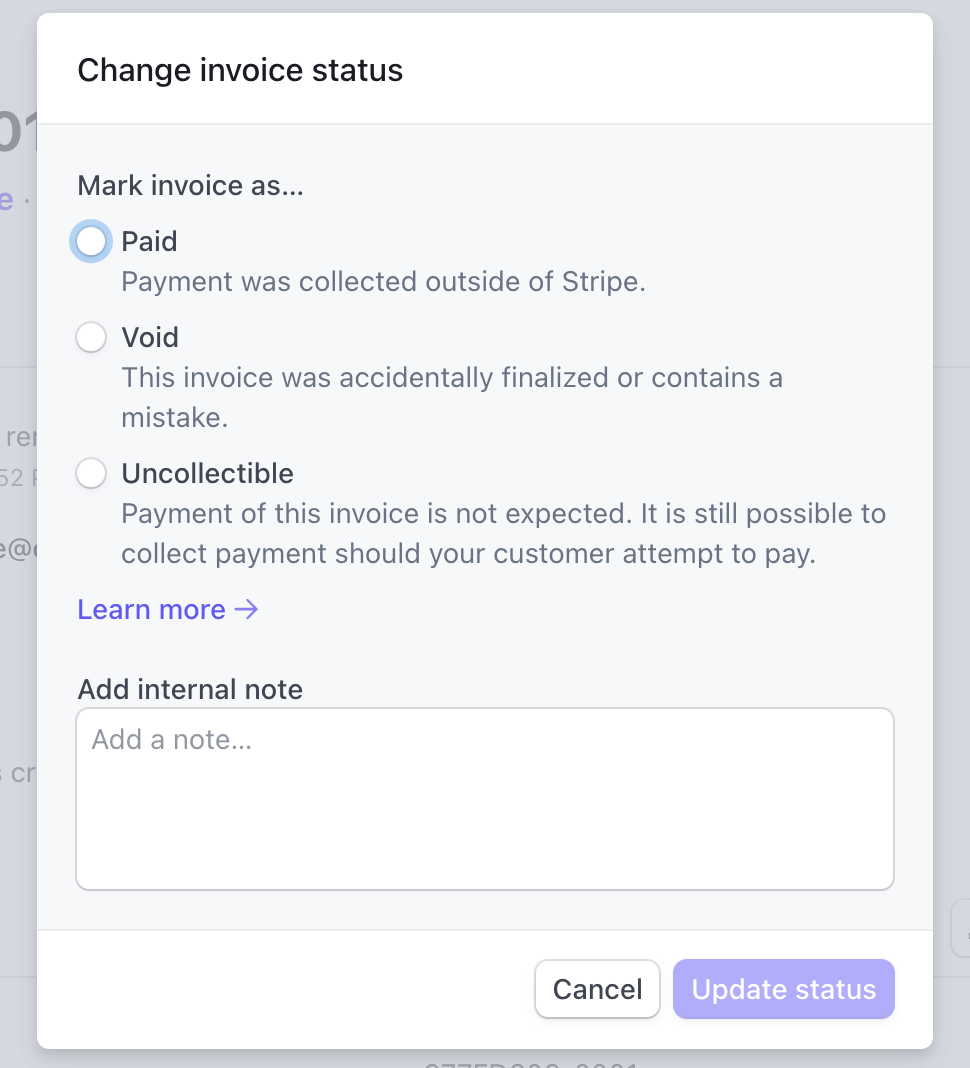
- Void = If an invoice was sent by mistake, or a new invoice has been generated to replace the old one (for example - new billing terms were agreed upon, or a customers billing information needs to be updated on the invoice before they make payment)
- Uncollectible = If someone doesn’t pay / churns.
- Paid = If payment was collected outside of Stripe (i.e. directly into one of our bank accounts). Indicate the account + date of posted payment in the internal notes section.
- It’s important that this is done as close to the time of payment as possible
Processing a Refund
- Navigate to the customer’s Stripe profile and scroll down to the Payment section. You can also select a payment to refund from the payments homepage.
- Select the payment you would like to refund.
- Click the Refund button at the top right hand of the screen
- By default, you’ll issue a full refund. For a partial refund, enter a different refund amount before confirming.
- Select a reason for the refund from the dropdown list. If you select Other you will need to add an explanation for the refund in the text box.
Issuing a Credit Note
Credit notes are documents that decrease the amount of an open or paid invoice. A credit note reduces the amount due without recording any payment.
In their documentation, Stripe provides a few example scenarios on when you may need to use credit notes:
You accidentally overbilled a customer—You accidentally charged your customer 110 USD instead of 100 USD because of a data entry mistake. Use a credit note to give your customer a 10 USD credit for the overcharge.
You’re short on inventory—You billed your customer for five items, but when it’s time to ship them you realize you only have three items left in stock. Use a credit note to refund your customer for the two items they didn’t receive.
Discounts—You and your customer negotiate a discount on an invoice. Instead of voiding the invoice and issuing a new one, you can use a credit note to adjust the amount owed on the existing invoice.
More on credit notes:
- When you issue a credit note for an open invoice, it decreases the amount due on the invoice. When you issue a credit note for a paid invoice, you credit the customer’s account balance or give them a refund outside of Stripe.
- A credit note reduces the balance of an open invoice to 0, the invoice status changes to paid.
- The difference between issuing a credit note and adjusting the amount of an invoice by revising it is that a credit note doesn’t void and replace the original invoice.
Steps for issuing a credit note:
- Navigate to the customer’s Stripe profile and scroll down to the invoice section.
- Select the open or paid invoice you want to add a credit note to.
- Click More and select Issue a credit note.
- If the invoice is paid, choose whether to refund the customer’s card, credit their balance, or refund the amount outside of Stripe.
- Click Issue credit note to submit the credit note.
Using Stripe Balances
Every customer has a Stripe balance that you can issue credit and debit adjustments against. All adjustments sum up to a balance that be applied to future invoices.
- As noted in the credit note section above, one option when issuing a credit note against an invoice is that you can credit the customer’s account balance.
- The available credit balance automatically applies toward the next invoice finalized to a customer. You are not able to choose a specific invoice to apply the credit balance to.
- You can manually adjust a customer’s available credit balance:
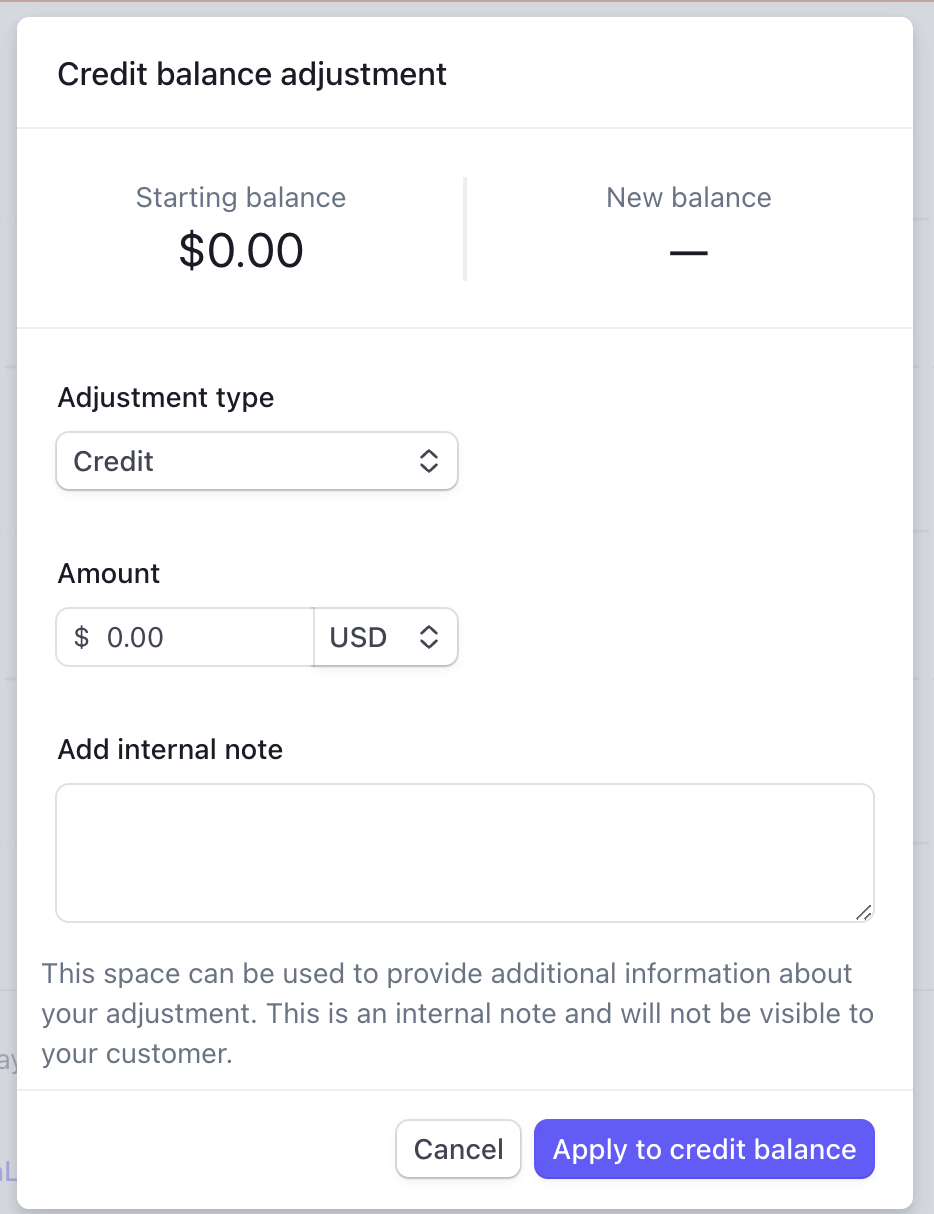
- Navigate to the customer’s Stripe profile.
- Scroll down to find the Invoice credit balance section, and click Adjust balance.
- Select the adjustment type from the dropdown menu.
- Enter the adjustment amount.
- Add an internal note on the reason for the adjustment.
- Confirm details and click Apply to credit balance.
- Once the pop-up closes you will be able to see the available balance for the customer under the Invoice credit balance section.

.svg)
.svg)